Unleash AI Animation: 4 Free Steps to Bring Your Images to Life
Unleash your creativity with AI animation! Learn 4 free steps to bring your images to life in minutes. Discover how to generate, erase, replace, and animate a tram scene in Porto, Portugal. Optimize for social media engagement and share your AI-powered creations.
July 25, 2024
Unlock the power of AI animation with this step-by-step guide. Discover how to create captivating, looping animations using only free AI tools, and bring your digital creations to life. Whether you're a beginner or a seasoned artist, this method will revolutionize your workflow and help you stand out on social media.
Unleash the Power of AI Animation: Turn Your Images Into Captivating Visuals
Step 1: Generate a Stunning AI Image
Step 2: Erase and Replace for a Polished Look
Step 3: Separate Assets for Seamless Animation
Step 4: Animate Your Creation with Ease
Unleash the Power of AI Animation: Turn Your Images Into Captivating Visuals
Unleash the Power of AI Animation: Turn Your Images Into Captivating Visuals
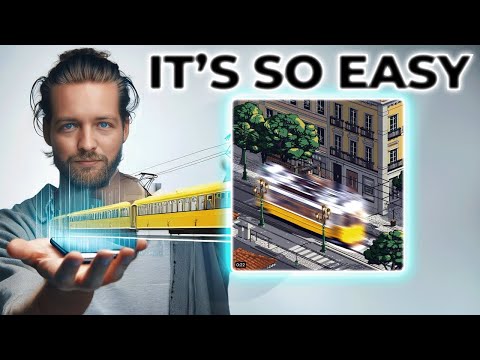
Creating AI animations has never been easier. With the right tools and techniques, you can bring your static images to life in just a few simple steps. In this section, we'll guide you through the process of transforming a 2D pixel art isometric scene of a tram in Porto, Portugal into a mesmerizing, looping animation.
First, we'll generate the initial image using a powerful AI model like ChatGPT. Then, we'll utilize Runway ML's erase and replace tool to clean up the background and isolate the tram. Next, we'll head to Photopea to extract the individual assets, ensuring a seamless animation.
Finally, we'll bring it all together in Capcut, a free video editor, by adding keyframes to the tram's movement and layering the various elements. The result is a captivating, looping animation that showcases the power of AI-driven visuals.
Whether you're a seasoned animator or a beginner, this step-by-step guide will equip you with the skills to create your own stunning AI animations. Unleash your creativity and let your images come to life!
Step 1: Generate a Stunning AI Image
Step 1: Generate a Stunning AI Image
To create a captivating AI animation, the first step is to generate a high-quality AI image. In this case, the goal is to create a 2D pixel art isometric scene of a tram in Porto, Portugal.
Using a powerful AI image generation tool like ChatGPT, you can prompt the model to generate the desired image. The key is to provide a detailed and specific prompt that captures the desired scene, including the perspective, style, and location.
Once you have the initial image, you may need to refine it through multiple iterations to achieve the desired look and composition. This could involve adjusting the prompt, experimenting with different AI models, or making minor edits to the generated image.
The end result should be a visually striking and well-composed AI image that serves as the foundation for the upcoming animation steps.
Step 2: Erase and Replace for a Polished Look
Step 2: Erase and Replace for a Polished Look
To create a polished look for the AI animation, we'll use the Runway ML platform to erase and replace elements in the generated image. Here's how:
- Go to Runway ML (runwayml.com) and sign in.
- Scroll down to find the "Erase and Replace" tool and drag your generated image into it.
- Use the brush tool to carefully remove the people from the scene, leaving only the street and tram.
- Experiment with the different street options provided by the tool to find the one that best fits the scene.
- Next, focus on the tram. Use the brush tool to carefully outline and select the tram, including the shading.
- Prompt the tool to generate a "pixel isometric street and tram line" and review the results. Choose the option that looks the cleanest and most polished.
- If needed, make minor adjustments to the tram and street elements to further refine the image.
- Once you're satisfied, accept the final result and move on to the next step.
By using the Runway ML platform to erase and replace elements, you can create a clean, seamless background for your AI animation.
Step 3: Separate Assets for Seamless Animation
Step 3: Separate Assets for Seamless Animation
To create a seamless animation, we need to separate the different elements of the scene into individual assets. We'll use a tool like Photopea.com to extract the building, tram, and lamp post as separate layers.
First, we'll use the polygonal lasso tool to carefully select the building outline, making sure to include the black edges. Then, we'll copy the selection to a new layer using Ctrl/Cmd + J.
Next, we'll repeat the process for the tram, selecting the entire tram and copying it to a new layer.
Finally, we'll do the same for the lamp post, ensuring we have all the necessary elements as individual assets.
It's important to export each asset as a transparent PNG file, as this will allow us to layer them effectively in the animation software.
With these clean, separated assets, we can now move on to the final step of animating the scene.
Step 4: Animate Your Creation with Ease
Step 4: Animate Your Creation with Ease
To animate your creation, we'll be using the free video editor Capcut.com. Follow these steps:
- Click on "New Video" and then "Upload" to add all the assets you exported earlier, including the background without the tram.
- Drag the background layer onto the first layer.
- Add the tram layer on a new layer above the background.
- Add the house and light pole layers on separate layers above the tram.
- Select the tram layer and click on "Basic" in the top right.
- Drag the playback head to the beginning and position the tram all the way to the right, out of frame.
- Click on "Add Keyframe" for the position.
- Drag the playback head to the end and position the tram all the way to the left, off-screen.
- The tram will now smoothly animate across the scene.
You can further refine the animation by adjusting the keyframes and timing. With these steps, you can now bring your AI-generated image to life with a simple and effective animation.
FAQ
FAQ